What is Google Consent Mode V2 ?
Google Consent Mode V2, introduced in late 2023, is an updated version of Google’s original Consent Mode. It allows websites to communicate users’ cookie consent preferences to Google’s services, such as Google Ads and Analytics, in a more efficient and privacy-compliant manner. Its use is mandatory for websites using these Google services by March 2024.
Google Consent Mode V2 introduces new parameters including ad_user_data and ad_personalization, in addition to the existing analytics_storage and ad_storage. These parameters offer enhanced control over user data and advertising personalization based on user consent.
Google expects these parameters to be set to "Denied" or "Granted", based on what a visitor selects in the Peppered Cookie banner. In this instruction we will show you how to do just that.
How to manage website visitor consent?
- Obtain the user’s consent choice to grant or deny consent for storing information about their behavior. You are responsible to obtain users’ consent on your website or app or any data you upload to Google.
For websites and apps, you can implement a consent banner or other custom consent solution, or use a Consent Management Platform (CMP). - Communicate the user’s consent choice, or consent state, to Google. Many CMPs handle sending the consent state to Google. If you implement a custom consent solution, you must implement a method to send the consent state to Google.
- Ensure that Google tags and third-party tags behave according to the user’s consent choice.
It looks easy, but you have to make sure you set up everything correctly, according to Google Consent and GDPR. This article will assist you in doing so by tackling the 3 points above.
1. Obtain the user’s consent choice
Your Peppered platform cookie banner is designed to obtain website visitor consent. The Peppered platform has two main layouts for cookie banners. Technically they both work the same, but only one is GDPR proof.
In order to provide a GDPR proof cookie banner, all consent options should be equally easy to make.
That's why our GDPR proof cookie banner offers the three consent levels as three distinct (but equal) buttons.
Make sure you switch on the Cookie consent banner in your Control Panel > Core
More information about setting up your GDPR proof cookie banner.
You will see your cookiebanner now looks like this:

There are a couple of Cookie consent states:
0. undefined:
The user did not supply a level of consent (The cookie banner is still showing)
1. default:
Only cookies required for the Peppered Platform website to function are set (the user selected "functional only)
In this case the Google Tagmanager is not loaded by default, so you cannot set any other cookies via the GTM.
All third party video and audio urls in your Dashboard are blocked in this state.
If you want to activate anonymous analytics or other tags you consider "functional" through GTM, there is an option to load GTM even in the undefined (0) and default (1) state. There is a setting called "load TagManager always" in Control panel > Tagmanager to enable the Tagmanager anyway, regardless of Cookie consent option.
2. limited:
This consent level loads the GTM and the "limited" setting is passed to the datalayer to be used in GTM.
You can activate tags in GTM that you think should be activate when a user has chosen "Allow limited" in the cookie banner. You can explain to the user what kind of cookies are set in this consent level by editing the text next to the button. All third party video and audio urls in your Dashboard are loaded in this state.
3. all:
This consent level loads the GTM and the "all" setting is passed to the datalayer to be used in GTM.
All cookies, including ad-tracking etc. are allowed once this level is chosen by the user by selecting "allow all" in the cookie banner.
If you are not using GTM at all, the only cookies that are used are pure functional, and you don't have to do anything.
2. Communicate this consent to Google
The obtained cookie banner consent states 0/1 (none), 2 (limited) and 3 (all) can be translated to the existing and new Google consent tags in GTM. For that we have provided a template for GTM (attached at the bottom of the page) and a step by step instruction here. This instruction provides a standardised mapping of Cookie banner settings to the 7 Google Consent tags.
In no way is this meant as a definitive set-up, but it is a good start that should work out of the box for all of your needs. You can always change consent settings yourself afterwards in GTM.
The template will set the Google tags to "denied" or "granted" based on the chosen Cookie banner option:
- The default values of Google tags when no consent was given:
(note that this will only be visible in GTM if you set "load TagManager always", as GTM is not loaded during this state by default)
- The default values of Google tags when consent was given for "functional only" cookies:
(note that this will only be visible in GTM if you set "load TagManager always", as GTM is not loaded during this state by default)
- The default values of Google tags when consent was given for "limited" cookies:

- The default values of Google tags when consent was given for "all" cookies:

In order to get these default consent levels mapped to the cookie banner, we first need to import the template file.
- Download the template file at the bottom of this page
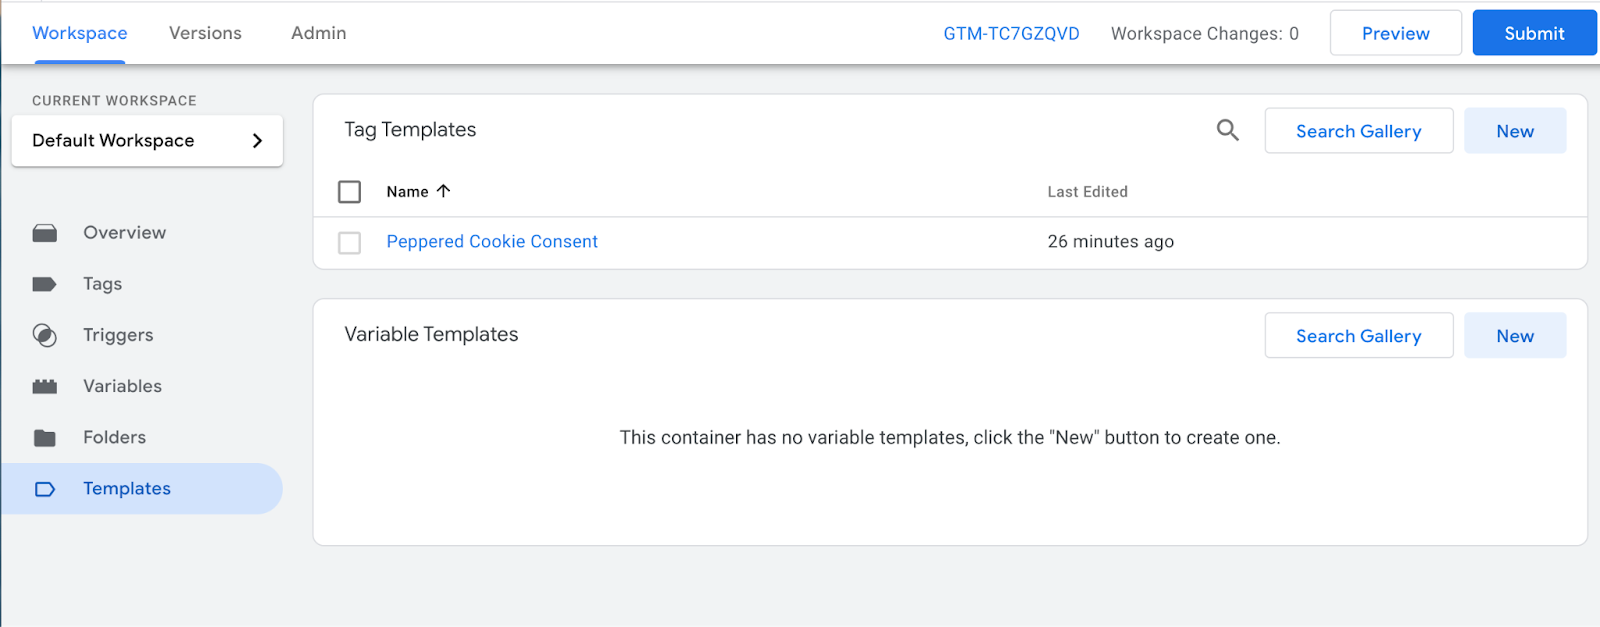
- In GTM, head to "templates" and click new under the Tag Templates section. When you click on the three little dots, you’ll have the option to import.

- Once it is imported successfully, you should see it listed:
- We now need to head to the Tags section on the left hand menu. Click to add a new tag. You should see the Peppered tag available when selecting.

- We then need to add triggers for the tag to fire. You can set it up with the configuration below, this sets a default consent and then updates according to the cookie settings on the site:
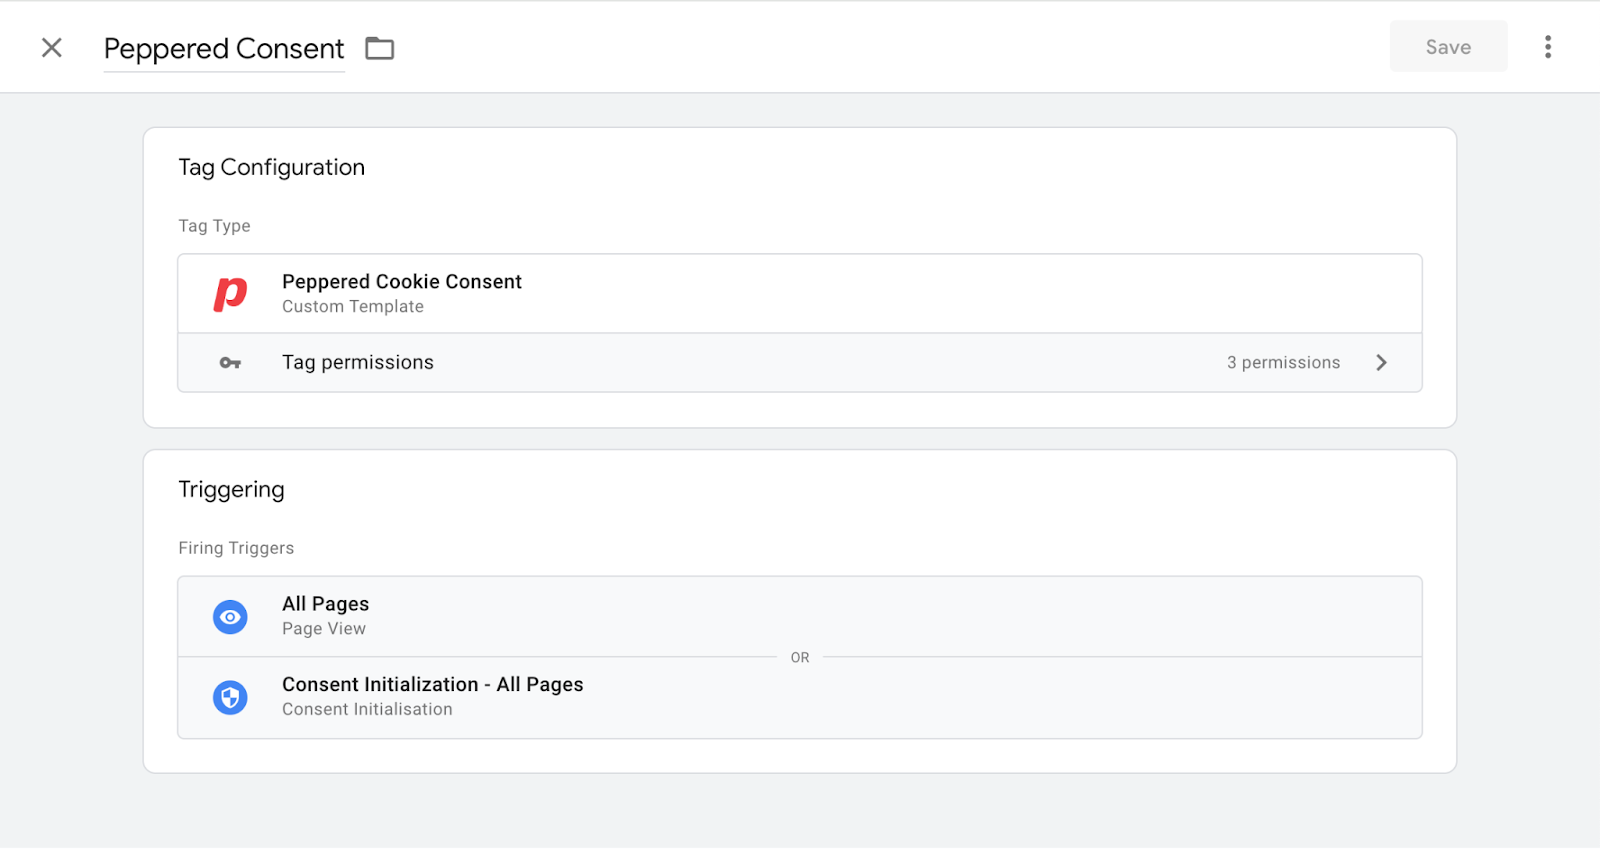
- Once this is all in place, we should be finished.
Testing your setup
- Go to preview mode.
- We need to remove the site cookie using chrome developer tools to run through all the tests.

- Pressing delete while highlighting the cookie_consent item in the application will remove it. This should cause the cookie banner to show when you reload the site.
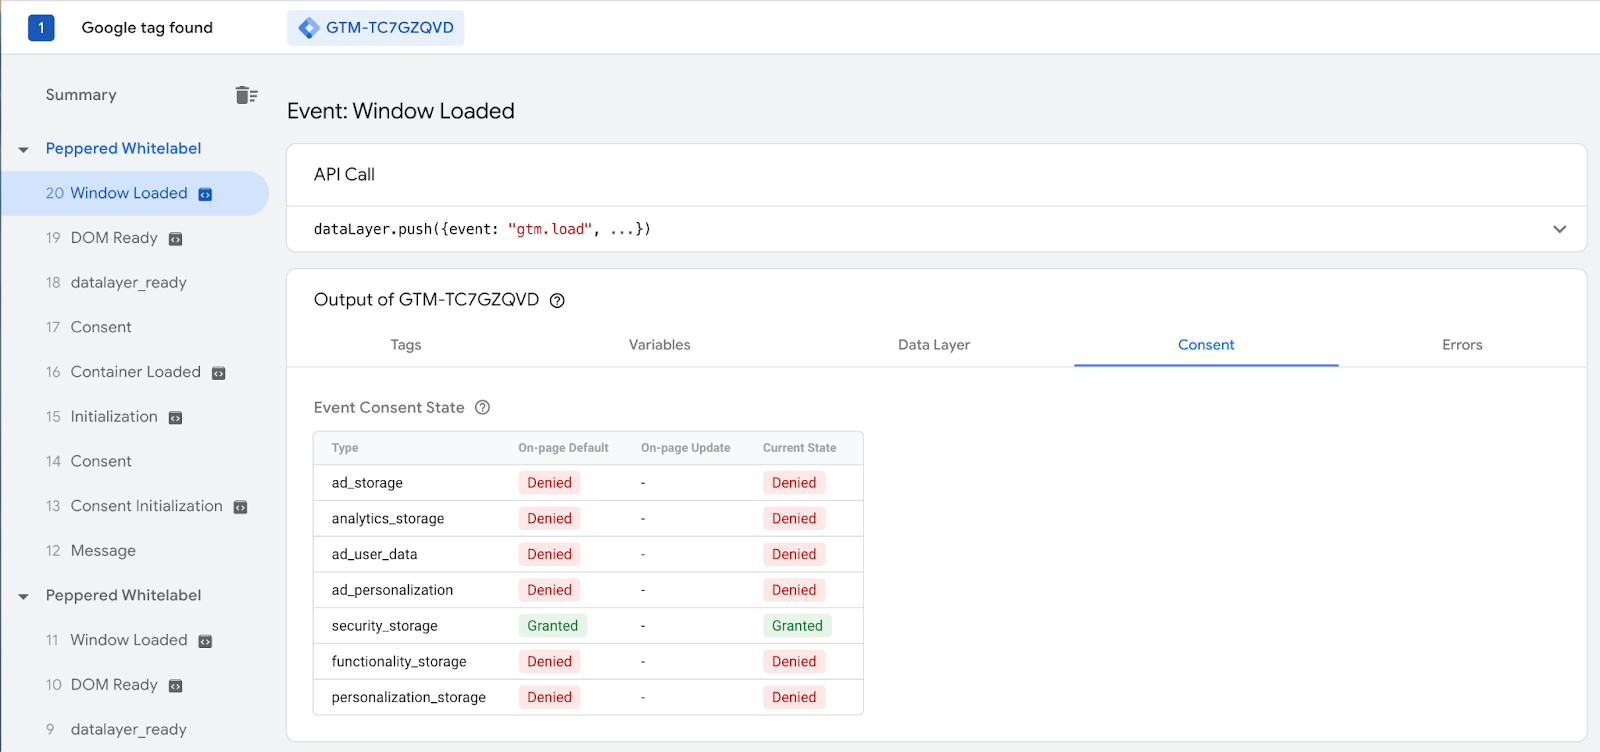
- When you first load the site in tag manager preview mode, don’t interact with the cookie banner. You should see something like the following in the tag assistant preview mode.
This only applies when "Load Tag Manager Always" is set to ‘Yes’ in the dashboard. If not, GTM is not loaded at all in this phase. This shows that we are defaulting to deny all consent except security_storage. This consent level does not require an explicit opt-in.
We should see the following after choosing the option for ‘Functional Only’. This option only allows cookies that are required to run the site. The consent level communicated to GTM is equivalent to the consent required for functional cookies set by the Peppered platform itself.
Again, this only applies when "Load Tag Manager Always" is set to ‘Yes’ in the dashboard. If not, GTM is not loaded at all in this phase.
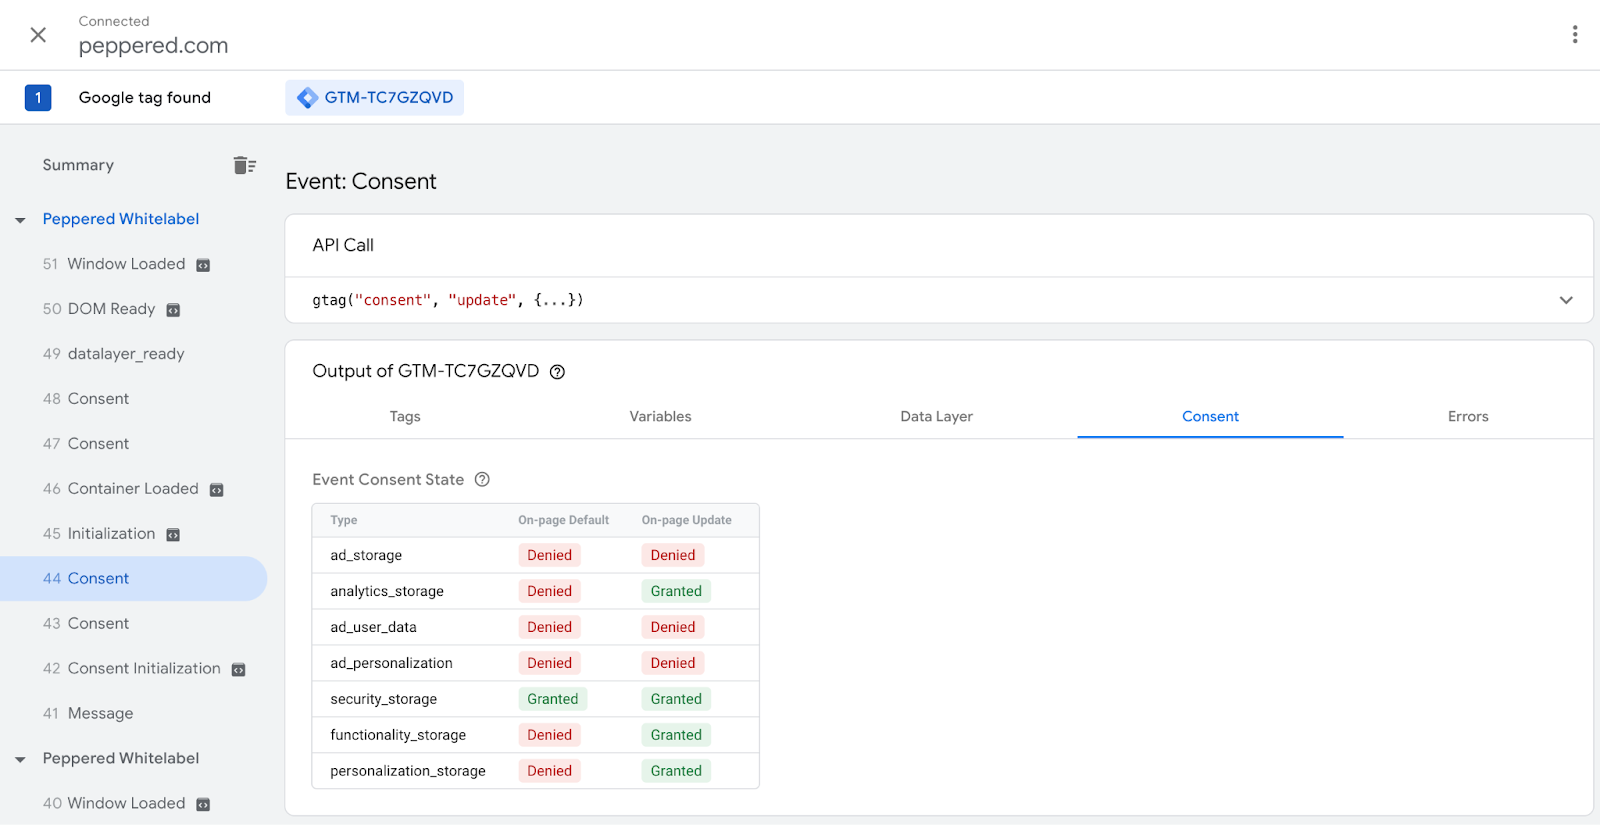
If we choose ‘Allow Limited’, we should see something like the below screenshots:
We are granting the additional consent for analytics storage at this level.
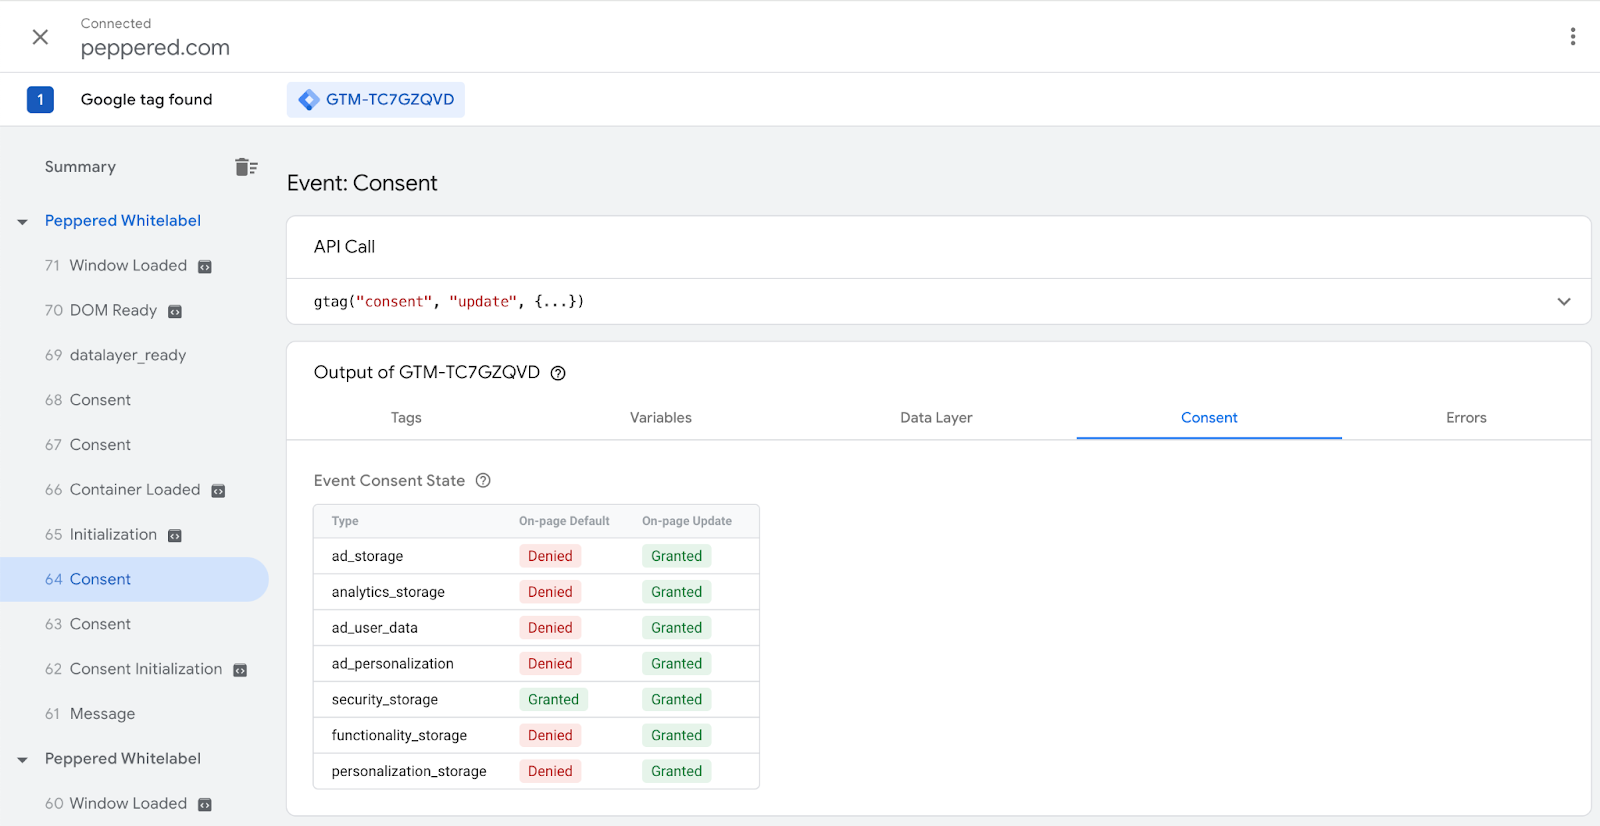
Repeating the test but choosing ‘all’ should show the following:
Again, a default state of denied that is then updated to granted for all consent levels.
When "Load Tag Manager Always" is set to ‘No’, The consent levels sent to GTM when the ‘Allow Limited’ or ‘Allow All’ options are chosen are the same. However, nothing is sent to GTM in the "default" or "Functional only" states of the Cookie banner.
3. Ensure that Google tags and third-party tags behave according to the user’s consent choice
For each tag you use in the GTM you will need to decide for yourself at which consent level this tag will be activated.
You could also already have tags that are directly connected to the Peppered Cookie banner consent levels "default", "limited" and "all". These tags will keep working, but you can reassign them to one of the new Google tags.
More information about using Peppered Cookie banner consent levels in your GTM.
Make sure the explanations next to the three buttons in your cookie banner reflect what kind of cookies the user is giving consent for. We provided some default text in the cookie banner, but you are welcome to rewrite this to reflect your own situation. You can find all template texts available in the cookie banner in the article
More information about setting up your GDPR proof cookie banner.